
Table of contents
- The Markdown
- The MDX
- What made the Markdown so special?
- How to use Markdown?
- Applying Markdown to your site.
- Applying Markdown to your site with Contentlayer
The Markdown
If You are familiar with Microsoft Word, then You are familiar with Markdown. Markdown is a lightweight markup language with plain text formatting syntax. It is designed so that it can be converted to structure data like HTML and many other formats whether JSON, XML, PDF and many more.
Markdown is often used to format readme files for writing messages in online discussion forums, and to create rich text using a plain text editor. With the easiness of using it the more it is used in the software development world for creating documentation sites, blogs, and many more.
Example:
# Cake

Cake is a form of sweet food made from flour, sugar, and other ingredients, that is usually baked.
In their oldest forms, cakes were modifications of bread, but cakes now cover a wide range of preparations that can be simple or elaborate,
and that share features with other desserts such as pastries, meringues, custards, and pies.

> Do not eat too much cake, it is not good for your health. 🥲

## ingredients

- 1 cup of flour
- 1 cup of sugar
- 1 cup of butter
- 4 eggs
- 1 teaspoon of baking powder
- 1 teaspoon of vanilla extract

...
The MDX
The MDX is an extension of the Markdown language that allows You to use JSX syntax in your Markdown files. This means You can embed React components directly in your Markdown files with benefits of styling them with CSS too.
Using of MDX create a greater opportunity for making Custom components, More granular control over the layout.
Example:
# Cake

Cake is a form of sweet food made from flour, sugar, and other ingredients, that is usually baked.
In their oldest forms, cakes were modifications of bread, but cakes now cover a wide range of preparations that can be simple or elaborate,
and that share features with other desserts such as pastries, meringues, custards, and pies.

<DecoratedQuote>
  Do not eat too much cake, it is not good for your health. 🥲
</DecoratedQuote>

## ingredients

- 1 cup of <Highlight>flour</Highlight>
- 1 cup of <Highlight>sugar</Highlight>
- 1 cup of <Highlight>butter</Highlight>
- 4 <Highlight>eggs</Highlight>
- 1 teaspoon of <Highlight>baking powder</Highlight>
- 1 teaspoon of <Highlight>vanilla extract</Highlight>

...
What made the Markdown so special?
Markdown is special for several reasons:
- Simplicity: Markdown's syntax is very simple and intuitive, making it easy to learn and use.
- Versatility: Markdown can be converted into many different formats like HTML, PDF, and more.
- Portability: Markdown files are plain text, so they can be opened and edited with any text editor.
- Readability: Even in raw form, Markdown is designed to be easy to read and write.
- Integration: Many platforms (like GitHub, Bitbucket, Jekyll, and more) support Markdown natively.
- Focus on Content: Markdown allows writers to focus on content rather than formatting and layout.
- Low learning curve: Markdown is easy to learn and use, even for non-technical users.
How to use Markdown?
Markdown is a lightweight markup language that allows You to write formatted text using a plain-text editor. It's designed to be easy to read and write, with simple syntax for common formatting tasks.
For example, to create a heading, You just add a hash symbol (#) before your text.
The more hash symbol amount the smaller the heading size You get.
For bold text, You surround the word or phrase with double asterisks (**bold**), and for italics, You use single asterisks (*italic*). Creating lists is straightforward using hyphens (-) or numbers (1., 2.) for ordered lists. Links are formed by placing the link text in square brackets followed by the URL in parentheses, like this [Workpod](https://workpod.supakorn.tech)
Applying Markdown to your site.
Now we know what is Markdown and MDX, let's see how we can apply it to our site via various procedures.
With React ⚙️
Plenty of developers are misudnerstanding that React is a javascript framework, but React is a library for building User Interface. Basically You will need to transpile from JSX into javascript to make it work, so by using the markdown / MDX with React You'll need to use a library to coordinate the transpilation procress. react-markdown is a package which help You create a React component that renders Markdown content.
The key features of the react-markdown
According to official documentation of react-markdown the key features are
- safe by default (no dangerouslySetInnerHTML or XSS attacks)
- components (pass your own component)
- plugins (many plugins You can pick and choose from)
- compliant (100% to CommonMark, 100% to GFM with a plugin)
react-markdown comes with benefits of unified plugins supported learn more about unified
For instance
const markdown = `Just a link: www.nasa.gov.`;

createRoot(document.body).render(
  <Markdown remarkPlugins={[remarkGfm]}>{markdown}</Markdown>,
);
With Next.js ⚙️
Next.js has built-in support for MDX, which makes it easy to create pages with Markdown content. But still offers the flexibility to use other Markdown libraries like remark and rehype for more customization. Please refer to the resource Next.js MDX
With Astro ⚙️
Astro is well known by its ability of combining multiple technologies together like React, Vue, Svelte, and more. It usually placed on the top list of Meta framework in some use cases espicially for creating documentation sites, Static sites, or in the scenario where You do not want a dynamically page generation.
Astro has built-in support for MDX, which makes it easy to create pages with Markdown content (I am even thinking that Astro did a prettry good job on Markdown).
The key features of Astro Markdown and content management
The next following features are the key features of Astro Markdown and content management
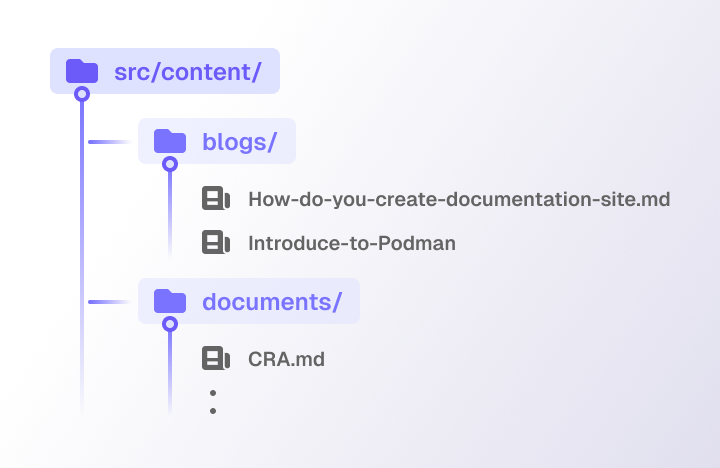
A special directory for storing content which is
src/contentby defaultThis raise the benefit of separating the content from the code
- File-based routing
Astro automatically generates routes for your content files based on their location in the
src/pages/directory. - Support Frontmatter layout
Fontmatteris a special block of YAML or JSON at the top of a Markdown file that contains metadata about the content. This metadata can be used to customize the layout of the content, set the title, author, and description, and more.--- layout: ../../layouts/BlogLayout.astro title: How do You create documentation sites briefDescription: Have You ever wondered how blog sites on the internet or any kind of software, libraries, and frameworks documentation sites are made? Behind mostly vibrant blogs and comprehensive documentations site are mad from extension name "MD" / "MDX". author: Supakorn Netsuwan tags: - Technical date: 2024/6/5 --- This is the blog content...And for layout component it goes like this
---
const {frontmatter} = Astro.props;
---

<html>
  <h1>{frontmatter.title}</h1>
  <h2{frontmatter.briefDescription}></h2>
  <h3>By {frontmatter.author}</h3>
  <slot /> <!-- Markdown content is injected here -->
</html>
Then You can customize the page layout based on the frontmatter data. for more detail of Astro Markdown and content management please refer to the resource Astro Markdown
Applying Markdown to your site with Contentlayer
If there need to have a markdown tool which can has a characteristic of one time learning and reapply with all frameworks, Contentlayer is the one You are looking for. Contentlayer helps You manage all document and encapsulate the process behind the scene.
From the official document: Contentlayer is a content SDK that validates and transforms your content into type-safe JSON data You can easily import into your application.
At the time this blog released, Contentlayer is still in the beta version, supporting with only Next.js while Remix, SvelteKit, Astro, and Vite are in the consideration, but hey it worth to give it a try! I'll explain further more why.
Benefits of using Contentlayer
Type safety
According to the official document, Contentlayer is type-safe. Type-safe feature makes it easy to use and reuse the content across the application. Improving the developer and author experience. Which means You can import the content into your application and use it with confidence that it will be correctly typed. This is especially useful when working with large applications or teams, where it's easy to make mistakes or forget how the content is structured. So You can automatically turn the unstructured data into structured data.
Unopinionated
The contentlayer does not strict the practice to implements the UI as well as the other libraries. It is up to You to decide how to use the content, but still give your best practice to scaffold the project You can abstract the content, logic transpiling with supportive of unified plugins and UI implementation to separated layers
Battery included
further more, Contentlayer has packed all the necessary tools for You to use no need to combine various libraries together which is proning to dependencies confict.
remarkandrehypefor markdown transformationgray-matterfor frontmatter parsingunifiedfor plugins support.
Optimized for performance
Contentlayer is optimized for performance thanks for the power of ESBuild, The unchanged content will be cached and will not forwarded to the transformation process again. Even with development environment the Contentlayer can determine the changes and only retransform the changed content.
Overall process
Pre-requisite
From official contentlayer document suggestion, You'll need to
- Install Dependencies (With Next.js)
By using
npm install contentlayer next-contentlayer date-fns
- Configuration the withContentlayer (With Next.js)
Contentlayer has provided the
withContentlayerwhich is a higher-order function that wraps the Next.jsnext.config.jsconfiguration file. This will help increase the developer experience during both development run time and build time by automatically manage the content transipration process.const { withContentlayer } = require("next-contentlayer"); /** @type {import('next').NextConfig} */ const nextConfig = { reactStrictMode: true, swcMinify: true }; module.exports = withContentlayer(nextConfig);
- TypeScript Configuration
Create an absolute path for the contentlayer configuration file by adding the
baseUrlandpathsto thetsconfig.jsonfile.{ "compilerOptions": { "baseUrl": ".", // ^^^^^^^^^^^ "paths": { "contentlayer/generated": ["./.contentlayer/generated"] // ^^^^^^^^^^^^^^^^^^^^^^^^^^^^^^^^^^^^^^^^^^^^^^^^^^^^ } }, "include": [ "next-env.d.ts", "**/*.ts", "**/*.tsx", ".next/types/**/*.ts", ".contentlayer/generated" // ^^^^^^^^^^^^^^^^^^^^^^ ] }
- Ignore build output
This will ensure that your generated content will not appear to the git repository.
.contentlayer
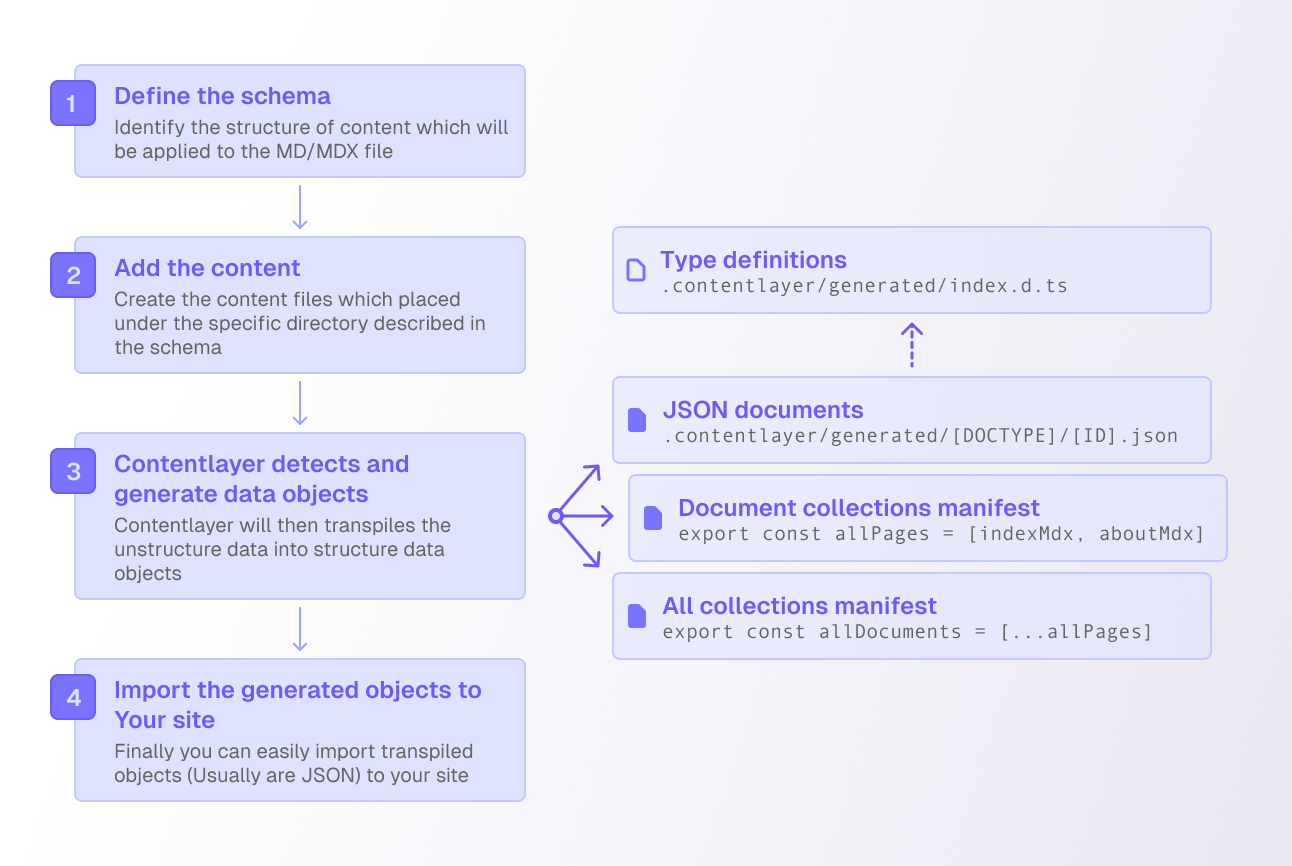
1. Define content schema
import { defineDocumentType, makeSource } from "contentlayer/source-files";

export const Blog = defineDocumentType(() => ({
  name: "Blog",
  contentType: "mdx",
  filePathPattern: `blogs/**/*.mdx`,
  fields: {
    title: { type: "string", required: true },
    briefDescription: { type: "string", required: true },
    thumbnail: {
      type: "string",
      required: false,
      default: "/blogs/thumbnail.png",
    },
    date: { type: "date", required: true },
    tags: {
      type: "list",
      of: {
        type: "enum",
        options: tags,
      },
    },
    author: {
      type: "string",
      default: "Supakorn Netsuwan",
      required: false,
    },
  },
  computedFields: {
    slug: {
      type: "string",
      resolve: (blog) =>
        blog._raw.flattenedPath.replace(blog._raw.sourceFileDir + "/", ""),
    },
    url: { type: "string", resolve: (blog) => blog._raw.flattenedPath },
  },
  description: "A blog post",
}));

export default makeSource({
  contentDirPath: "content-layer",
  documentTypes: [Blog],
});
2. Add the content
---
title: How do You create documentation sites
briefDescription: Have You ever wondered how blog sites on the internet or any kind of software, libraries, and frameworks documentation sites are made? Behind mostly vibrant blogs and comprehensive documentations site are mad from extension name "MD" / "MDX".
tags:
  - Technical
date: 2024/6/5
---

# The blog title

The content goes here...
3. Contentlayer detects and generate data objects
Generated documents are placed in .contentlayer/generated/[DOCTYPE]/[ID].json. Type of documents witll be placed at the .contentlayer/generated/index.d.ts
4. Import the generated objects to Your site
After this pointer They're all up to you, using of generated objects are simple and easy to use. Contentlayer is unoppinionated so You can decide how to use the content.
import allBlogs from "contentlayer/generated";

const Blogs = () => {
  return (
    <div>
      <h1>All blogs</h1>
      {allBlogs.map((post) => (
        <Blog key={post.url} {...post} />
      ))}
    </div>
  );
};

export default Blogs;